How to 3D Print D&D Miniatures: A Beginner's Guide
How to 3D print D&D miniatures as a beginner: FDM vs resin, finding STL files, supports and slicer basics, and a realistic first-print plan with real costs.
To 3D print D&D miniatures you need three things: a printer, STL model files, and slicer software that turns those models into print instructions. For 28mm tabletop minis, a resin printer gives the sharpest detail, while an FDM printer is cheaper and better for terrain. Beginners should start small with pre-supported files and a forgiving subject, then scale up. The learning curve is real, but the per-mini cost drops to a few cents once you are set up. This guide walks through the full beginner workflow, from choosing a printer to a realistic first-print plan.
FDM vs resin: which printer for D&D minis
These are the two technologies you will choose between, and they print very differently.
FDM (fused deposition modelling) melts plastic filament and lays it down layer by layer. It is cheap to run, the plastic is tough, and there are no toxic liquids to handle. The downside is detail. Nozzle size and layer height cap how fine FDM can go, so thin swords, facial features, and shallow textures tend to soften or disappear. FDM prints almost always show visible layer lines, especially on curves, and paint exaggerates those lines unless you sand or fill first.
Resin (MSLA) uses light to cure liquid resin one layer at a time. It resolves sharp edges, tiny recesses, and smooth curves far better than FDM. Resin minis come off the plate looking dramatically better straight away, with layer lines subtle enough that primer usually hides them. The trade-offs are mess and safety: resin is toxic uncured, it smells, and you need gloves, isopropyl alcohol for washing, and good ventilation.
For 28mm character minis, resin is the usual pick because detail is the whole point. FDM earns its place on terrain, scenery, and larger set-piece models where toughness matters more than crisp faces. A current beginner FDM machine runs around $200, and a popular beginner resin printer sits around $200 to $300, so owning both is realistic for roughly $500 to $600 if you go that far.
How to find STL files for miniatures
An STL file is the 3D model your printer needs. You cannot print a mini without one, and where you get them shapes your whole experience.
There are three main routes. Curated packs are sets of models sold as a single download, often themed around a creature type or faction. These are the easiest to use because someone has already organised and tested them. Monthly creator subscriptions drop a new batch of models every month through a patronage platform, which is great once you print regularly but overkill on day one. Free community libraries host thousands of user-uploaded models at no cost, though quality and print-readiness vary wildly.
The single most useful thing to look for as a beginner is pre-supported files. Supports are the scaffolding that holds up overhanging parts during printing, and placing them well is genuinely the hardest skill to learn. A pre-supported STL has that work done for you, so you can print a good mini before you understand support theory. Start there.
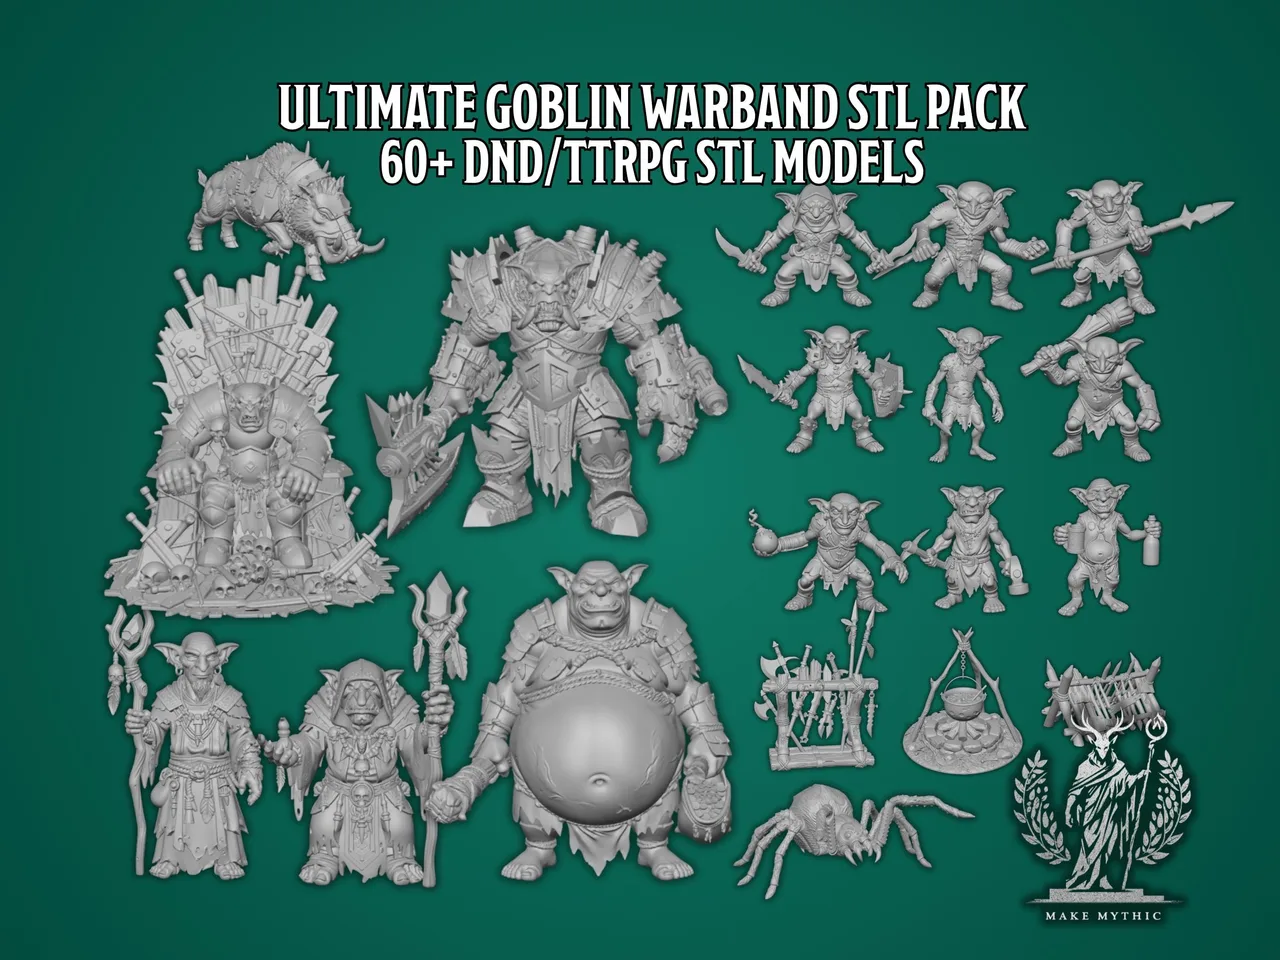
A goblin pack is close to the ideal first purchase. The RPG Goblin STL Pack ($31 $7.75) gives you a set of varied sculpts of a creature you will actually use over and over. Goblins are small, so they print fast and cheap, and a few failed prints cost you almost nothing in resin while you learn. That makes them the perfect learning subject and a genuinely useful warband once you nail the process.
Supports and slicer basics
A slicer is the software between your STL file and your printer. It converts the 3D model into thin horizontal layers and tells the machine how to print each one. The two common beginner slicers in the mini hobby are Lychee Slicer and Chitubox. Both have a free tier that does everything a beginner needs. Chitubox has a simpler interface that is quick to learn; Lychee has a stronger auto-support algorithm and a slightly steeper curve. Either is fine to start.
Layer height controls how fine the print is. For most minis, 0.05mm (50 microns) is the standard. It is fast enough for batch printing and fine enough that layer lines disappear at normal viewing distance. Drop to 0.02mm or 0.025mm only when you want extreme detail and have time to spare.
Supports hold up parts that would otherwise print into thin air, like outstretched arms, raised weapons, and capes. If you skip them, those parts fail. Beginner approach:
- Start with pre-supported files whenever you can, so the work is done.
- When you do support a model yourself, use the slicer’s auto-support on light or medium settings first.
- Rotate the model 10 to 45 degrees on the build plate. Angling it reduces the number of supports needed and improves print success.
- Avoid putting supports on detail-rich surfaces like faces and chainmail. Orient the model so those areas point away from the supports.
For minis you care about, manually reviewing and adjusting the auto-placed supports gives noticeably better results, but that is a skill to grow into, not a day-one requirement.
A realistic first-print plan: start with a goblin warband
Do not make your first print a detailed hero mini you care about. Make it a goblin warband. Here is why and how.
Goblins are small, so each one uses little resin and prints relatively quickly. They are forgiving: a goblin with a slightly rough cloak or a faint layer line still looks like a goblin on the table. And you will genuinely use a goblin warband, because few creatures show up in low-level D&D as often. That combination, cheap plus forgiving plus useful, is exactly what you want while you are still making mistakes.
A sensible first session:
- Load six to eight goblins from a pre-supported pack into your slicer.
- Arrange them on the plate with space between each, angled to reduce supports.
- Slice at 0.05mm layer height and start the print.
- Once printing finishes, wash the minis in isopropyl alcohol, cure them under UV (sunlight works in a pinch), then snip off the supports with flush cutters.
- Clean up any support nubs with a hobby knife.
Your first batch will not be flawless. Maybe one goblin’s arm fails, or a support scar shows. That is normal and it is the point: you learned supports, orientation, washing, and curing on models that cost cents and do not need to be perfect. Your next print will be better.
What 3D printing minis actually costs
The honest cost picture has two parts: the per-mini material cost, and the upfront setup.
Per mini, material is cheap. A 28mm mini costs roughly $0.20 in FDM filament and about $0.27 in resin. A single 1L bottle of resin prints around 250 minis. So once you are running, a goblin warband costs you small change.
Upfront, you are buying a hobby, not a mini. A beginner resin printer is around $200 to $300. On top of that you need resin, isopropyl alcohol for washing, a curing source, gloves, and a few tools like flush cutters. Budget realistically for the printer plus consumables, not just the printer’s sticker price.
The break-even maths only works if you print a lot. Compared with buying pre-painted plastic minis at several dollars each, printing pays for itself once you are turning out warbands regularly. If you only need the occasional mini, paper minis or buying singles is cheaper and far less hassle. 3D printing rewards volume and patience.
Where 3D printing fits in your table setup
3D printed minis are one tool among several, and the smart move is to use each where it shines. Printed minis are best for set-piece monsters and creatures you field in numbers, like that goblin warband. For the bulk of one-off NPCs and quick swaps, printable paper miniatures are faster and cheaper, and our guide to printable D&D paper miniatures covers that workflow in full. For online or hybrid play, a clean token maker turns the same art into VTT-ready tokens in seconds.
If you are still assembling your wider kit, the roundup of the best free D&D DM tools points to browser-based generators and trackers that pair well with a physical mini collection. Print what deserves the table presence, and let free tools handle the rest.
Frequently asked questions
- Is FDM or resin better for 3D printing D&D miniatures?
- Resin wins on detail. It cures liquid resin with light, so faces, weapons, and chainmail come off the plate sharp and almost smooth. FDM is cheaper and tougher but shows layer lines on small minis. For 28mm character minis, most people choose resin; FDM is better for terrain and larger pieces.
- How much does it cost to 3D print a D&D miniature?
- The material cost per 28mm mini is roughly $0.20 on FDM and about $0.27 on resin, since a 1L bottle of resin prints around 250 minis. The real cost is the printer itself, usually $200 to $300 for a beginner machine, plus resin, isopropyl alcohol, and supports.
- Where do I find STL files for D&D miniatures?
- STL files are the 3D model files your printer needs. You can buy curated packs on Etsy, subscribe to a monthly creator on a patronage platform, or download free models from community libraries. Pre-supported files are best for beginners because the hard support work is already done.
- Do I need to add supports to print miniatures?
- Yes, almost always. Supports hold up overhanging parts like arms, weapons, and capes while the layers cure. Beginners should start with pre-supported STL files or use a slicer's auto-support feature on light or medium settings, then print and learn from the results.
- What should I 3D print first as a beginner?
- Start with a goblin warband. Goblins are small, cheap to print in volume, forgiving of minor flaws, and you will actually use them at the table. Printing six to eight goblins teaches you supports, orientation, and post-processing on models that do not need to be perfect.
Keep reading
From the shop
Battlemaps, spell cards, and magic item cards, ready to print.
Browse MakeMythic on Etsy →